I have an old Christmas tree with several independent prewired light segments on it. About half of these segments no longer work. I figured it was just a matter of finding the blown out bulbs and replacing them. I also knew the sets always claimed that if "one blows out, the rest stay on", but in practice those claims seem to not pan out.
In researching how to find the dead bulbs I came across a product called the Light Keeper Pro. I didn't really understand how this product worked, or even really what it was supposed to do, but it was only $20, and I was confident I could fix the lights with the right tools.


The device has a lot of functions built in; it's really a Christmas light Swiss Army Knife. The one I thought I'd be using is the bulb tester, where you just pull the bulb out and stick it in the top and it'll light up if it works. There's a similar fuse tests, although the company reiterates several times that fuses are rarely the problem. There is also a non-contact voltage detector, which I have several of already, but is nice to have on there. It's only useful for faults where there is a break in the circuit, like a missing bulb, or a cut wire. There's a bulb remover tool, which I haven't really been able to figure out, and haven't tried very hard because I don't have trouble just pulling the bulbs out.
The star of the show though, is the quick fix trigger. The instructions explain you remove any bulb from a non-working section and insert the socket into the front of the device (essentially the device fits like a giant "bulb"). You then click the trigger several times, and the lights somehow come on. You do all this while the lights are plugged into the wall.
I almost skipped even trying this because it seemed so absurd. But once I figured out exactly what they wanted me to try, I did it, and it worked, over and over again. There were probably 5 different sections on this tree that didn't work, and this thing fixed each one in 30 seconds. Now, to be clear, it doesn't make blown out bulbs come back on, but it does make it so that the "one blows out, the rest stay on" function actually works. After the section comes back on you have to replace the burned out bulbs with new ones.
It may not surprise you that this led to me learning a lot about Christmas lights. Now you're going to learn a lot about Christmas lights too.
How do Christmas lights work?
They start out pretty simple. 50 bulbs, each with a resistance of about 2.5Ω are in series. Their resistances add, and so overall the string has a resistance of about 125Ω. You plug that into 120 VAC and you get about 1 amp flowing through them. You can imagine that each bulb shares an equal portion of the voltage, so each bulb has 120 / 50 = 2.4 volts across it. If you took a single bulb and put 2.4 volts across it, it'd light up the same as if it were in a set. The filament is just a piece of wire, which is so thin that it heats up very hot when the amp is flowing through it, and it glows. Eventually that filament wears out and literally burns out from the heat. At that point, the filament is gone and there is a gap which the current can't flow over. Since every bulb is in series, current can't flow at all, and the entire set goes out.

I took this picture from here and it shows the situation. If your set has more than 50 bulbs then it probably has a multiple of 50 (100, 150, etc). In that case it's just a few of these sets of 50 just all connected together at the plug, like the next picture shows.

How do "one blows out, the rest stay on" lights work?
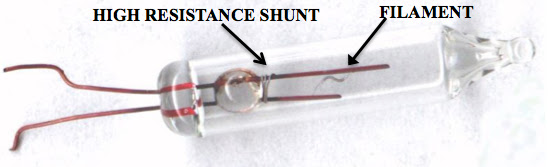
The magic of these is entirely within the bulb. The wiring is same as above, just bulbs connected in series, but the difference is a "shunt" in the base of each bulb. The idea is that if filament burns out, then the current can instead travel over the shunt. The shunt is much thicker, so it doesn't heat up and glow.

No comments:
Post a Comment